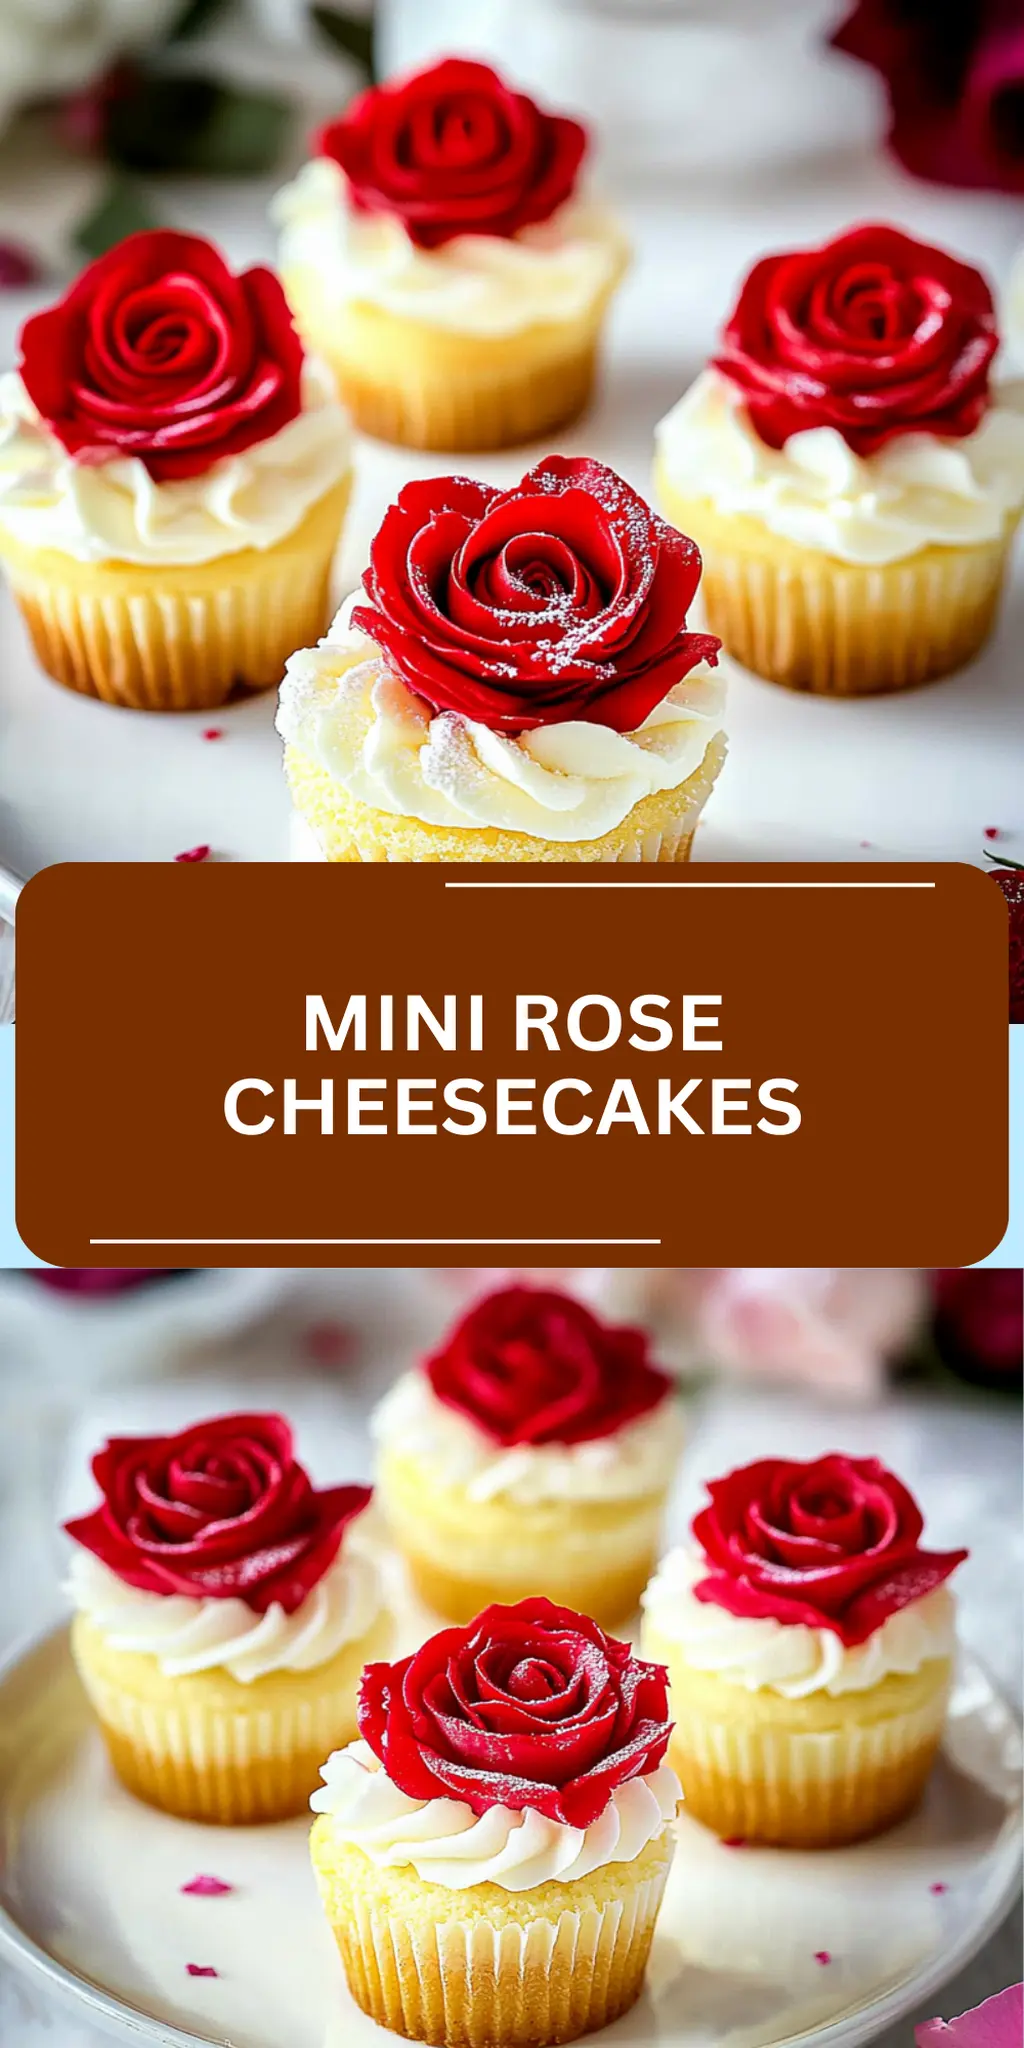
The fleeting scent of rose water has a way of transporting me to dreamy garden afternoons, where I can almost hear the faint buzz of bees doing their gentle work. And just when I think I've mastered every dessert, I discovered something enchanting: Mini Rose Cheesecakes. These little delights are the perfect blend of creamy richness and floral notes that not only impress but warm the heart.

After a long week filled with hurried meals and takeout, I craved a treat that would bring the elegance of a special occasion right into my kitchen. With just a handful of ingredients and minimal fuss, these bite-sized cheesecakes turned my ordinary day into a celebration. Plus, they’re a breeze to whip up, making them an ideal choice for everything from afternoon tea to a casual gathering with friends.
Join me in creating these charming mini desserts that will have everyone asking for seconds—even those who usually eye cheesecake with skepticism. The delightful flavor and stunning look will surely become your new go-to treat!
Why You'll Love This Mini Rose Cheesecakes
- These Mini Rose Cheesecakes are incredibly easy to make, allowing anyone to achieve a gourmet dessert without the hassle.
- The unique floral flavor from the rose water adds a refreshing twist that sets these cheesecakes apart from traditional recipes.
- Their charming presentation topped with edible rose petals makes them visually stunning, perfect for impressing guests at any gathering.
- With their bite-sized portions, these treats are crowd-pleasers that will have everyone coming back for more.
Mini Rose Cheesecake Ingredients
• Discover the simple but delightful components!
For the Crust
- Graham cracker crumbs – these provide a sweet and crunchy base that complements the creamy filling.
- Unsalted butter – adds richness and helps bind the crumbs together for a sturdy crust.
For the Filling
- Cream cheese – the star ingredient that creates a rich and creamy texture, essential for any cheesecake.
- Granulated sugar – balances the cream cheese's tanginess with sweetness, enhancing the flavor of the mini rose cheesecakes.
- Vanilla extract – adds a warm, aromatic note that complements the floral flavors beautifully.
- Heavy cream – contributes to a light and fluffy texture, making each bite melt in your mouth.
- Rose water – infuses a delicate floral aroma, transforming ordinary cheesecakes into something special.
For Garnish
- Edible rose petals – not only do they add a beautiful touch, but they also enhance the floral theme and make your dessert look elegant.
How to Make Mini Rose Cheesecakes
-
Preheat your oven to 350°F (175°C). This warm-up is essential for achieving that perfect cheesecake texture—creamy with just the right amount of firmness, so don’t skip this step!
-
Mix the graham cracker crumbs and melted butter in a bowl until well combined. Press this mixture firmly into the bottoms of your mini cheesecake pans to create a solid, crunchy crust.
-
Beat the cream cheese and sugar together in a large bowl. Continue mixing until smooth and creamy, which will create the luscious base for your cheesecake.
-
Add the heavy cream and vanilla extract to your mixture. Beat until fluffy and pale, bringing a lightness to your dessert's filling.
-
Incorporate the rose water gradually into the fluffy mixture. This will elevate your cheesecakes with a wonderful, aromatic flavor that blooms in every bite.
-
Pour the filling evenly over the prepared crusts in the pans to ensure that every cheesecake has a delightful balance of creamy goodness.
-
Bake for 20-25 minutes until the cheesecakes are set but still slightly jiggly in the center. This slight jiggle ensures a smooth texture after cooling!
-
Cool at room temperature before transferring them to the fridge. Let them chill for at least two hours to reach the perfect creamy consistency.
-
Garnish your mini rose cheesecakes with edible rose petals for a stunning finish. This touches off the floral theme and makes each dessert a visual delight before serving.
Optional: Drizzle with a light rose glaze for extra sweetness!
Exact quantities are listed in the recipe card below.
Mini Rose Cheesecakes Variations
Feel free to get creative and tailor these delectable mini cheesecakes to your taste!
-
Gluten-Free: Substitute gluten-free graham cracker crumbs for a delicious crust that’s safe for gluten-sensitive friends.
-
Vegan: Use dairy-free cream cheese and coconut whipped cream for a plant-based twist that remains rich and satisfying.
-
Citrus Infusion: Add a teaspoon of lemon or orange zest to the filling for a zesty burst of flavor that brightens each bite beautifully.
-
Chocolate Drizzle: Melt dark or white chocolate to drizzle over the cooled cheesecakes for a sweet contrast to the floral notes.
-
Lime Variation: Replace rose water with lime juice for a tangy, tropical take that still keeps your guests guessing.
-
Berry Bliss: Fold in crushed raspberries or blueberries into the filling before baking, introducing a pop of color and fruity flavor.
-
Minty Fresh: Add a few drops of peppermint extract for a cooling sensation that partners wonderfully with the creamy texture of the cheesecake.
-
Nutty Crunch: Top with crushed pistachios or walnuts for added crunch and a nutty flavor that rounds out the sweetness.
How to Store and Freeze Mini Rose Cheesecakes
Fridge: Keep your mini rose cheesecakes stored in an airtight container in the refrigerator for up to 3 days. This helps maintain their creamy texture and delightful flavor.
Freezer: For longer storage, freeze the cheesecakes in a single layer on a baking sheet until firm, then transfer to a freezer-safe container. They can be stored for up to 2 months.
Defrosting: To enjoy your frozen mini rose cheesecakes, simply transfer them to the fridge and let them thaw overnight. This will preserve their velvety texture and rich taste.
Reheating: If you prefer them slightly warmed, microwave individual portions for 10-15 seconds. This will enhance their flavors without compromising their creamy consistency.
What to Serve with Mini Rose Cheesecakes?
Imagine a table set for an evening of laughter and delight, complemented by flavors that dance upon your palate, evoking the warmth of cherished memories.
-
Fresh Berries: A mix of strawberries and raspberries adds a tangy freshness that perfectly contrasts the creamy sweetness of the cheesecakes.
-
Whipped Cream: Light and airy, dollops of fresh whipped cream enhance the richness while lending a classic touch that everyone loves.
-
Herbal Tea: A pot of chamomile or mint tea offers a soothing complement, balancing the floral notes of the cheesecakes with its own gentle warmth.
-
Chocolate Shavings: Sprinkle some dark chocolate shavings on top for a decadent touch that adds depth and a hint of bitterness against the sweet dessert.
-
Pistachio Crumble: Finely crushed pistachios atop the cheesecakes not only add a delightful crunch but also a nutty flavor that pairs beautifully with the rose accents.
-
Sparkling Lemonade: A refreshing, bubbly drink to serve alongside elevates the dining experience, providing a zesty contrast that refreshes the palate.
-
Lavender Shortbread Cookies: These delicate cookies enhance the floral theme and offer a crunchy, buttery treat that complements the cheesecakes beautifully.
Creatively pairing these elements will turn your gathering into a fragrant, flavorful experience, ensuring your Mini Rose Cheesecakes shine even more!
Make Ahead Options
These Mini Rose Cheesecakes are a delightful treat that lend themselves beautifully to meal prep! You can prepare the crusts up to 3 days in advance by mixing the graham cracker crumbs and melted butter, then storing them tightly covered in the refrigerator. The filling can also be made up to 24 hours ahead; simply beat the cream cheese, sugar, heavy cream, and rose water, and store it in an airtight container in the fridge. When you're ready to serve, pour the filling over the chilled crusts and bake as directed. This way, you’ll have an elegant dessert ready with minimal effort, preserving all the amazing flavors and textures just as delicious as on the day they were made!
Chef's Helpful Tips
- When making Mini Rose Cheesecakes, ensure your cream cheese is at room temperature for easier mixing and a smoother filling.
- Avoid overmixing the filling after adding the heavy cream, as this can incorporate too much air and cause cracks during baking.
- Use a water bath while baking to help maintain moisture and create a gentle cooking environment, which is key for a creamy texture.
- Allow the cheesecakes ample time to chill in the refrigerator for at least two hours; this step is crucial for achieving the ideal firmness and flavor enhancement before serving.
Mini Rose Cheesecakes Recipe FAQs
How do I choose the perfect cream cheese for my Mini Rose Cheesecakes?
Absolutely! I recommend using full-fat cream cheese for the richest and creamiest texture. Look for a brand that feels smooth and not overly soft in the package. Avoid low-fat or whipped cream cheeses, as they won’t provide the same delightful consistency.
What's the best way to store Mini Rose Cheesecakes?
Very! Keep your mini rose cheesecakes in an airtight container in the refrigerator for up to 3 days. If you want to extend their shelf life, wrap each cheesecake tightly with plastic wrap before placing them in the container to prevent moisture loss.
Can I freeze my Mini Rose Cheesecakes? If so, how?
Definitely! To freeze your cheesecakes, first, allow them to cool completely at room temperature. Then, place them in a single layer on a baking sheet and freeze until firm, about 2-3 hours. Afterward, transfer them to a freezer-safe container or wrap them individually in plastic wrap. They'll keep well for up to 2 months.
What if my cheesecakes are cracking during baking?
That can happen! Ensure that you’re not overmixing your filling, especially after adding the heavy cream, as this can incorporate too much air. Also, utilizing a water bath while baking can help maintain even heat and moisture, reducing the chances of cracking. If you find your cheesecakes jiggly in the center after the time is up, that’s perfect—just let them cool slowly to set properly.
Are there any dietary restrictions I should be aware of with Mini Rose Cheesecakes?
Great question! If you or someone you’re serving has dairy allergies, you can use dairy-free cream cheese and coconut cream as an alternative for the heavy cream. Also, be sure to check the ingredients in the graham crackers for any allergy concerns. For a gluten-free option, you can substitute the graham crackers with gluten-free crumbs.
How do I know when my Mini Rose Cheesecakes are done baking?
To check for doneness, gently shake the pan; the center should be slightly jiggly but not liquid. If it wobbles all over, give it a few more minutes in the oven. The perfect texture will set as they cool. It usually takes about 20-25 minutes for them to bake, so be sure to keep an eye on them!
Mini Rose Cheesecakes
Ingredients
Equipment
Method
- Preheat your oven to 350°F (175°C).
- Mix the graham cracker crumbs and melted butter in a bowl until well combined. Press this mixture firmly into the bottoms of your mini cheesecake pans.
- Beat the cream cheese and sugar together in a large bowl until smooth and creamy.
- Add the heavy cream and vanilla extract to your mixture and beat until fluffy and pale.
- Incorporate the rose water gradually into the mixture.
- Pour the filling evenly over the prepared crusts in the pans.
- Bake for 20-25 minutes until the cheesecakes are set but slightly jiggly in the center.
- Cool at room temperature before transferring them to the fridge. Let them chill for at least two hours.
- Garnish with edible rose petals before serving.
Leave a Reply